How to Make Faux Mosaic Tiles - Repurposing Craft Demo

Mosaic tiles are hugely popular right now.
In reality, mosaic tiles have been around for centuries. Mosaic works have been highly sought after pieces of art around the world.
I love them. They are tons of fun but if you have seen a few, you know they are really heavy.
Would you like the look of a mosaic tile work without the weight or the fancy price? How about something custom with a Tuscany grape motif?
Come along here with me to see just how it got pulled off the do it yourself way. It was fun and it was frugal.
This is a easy craft that most ages can master. Let's see how this thing was made and what you can use as substitutes for required materials.
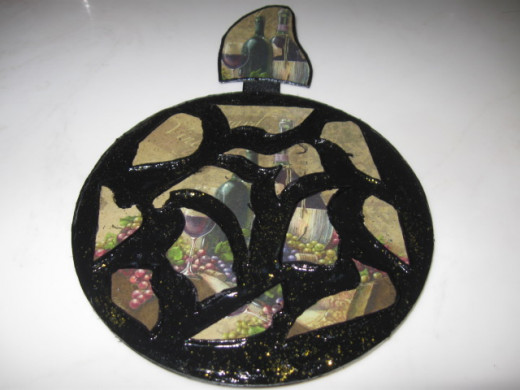
The finished tile yet to be hung.

The hanger is totally optional.

Choices!
For base - A box that has been cut, chip board, corrugated cardboard.
For coaster - Trading cards, playing cards, greeting cards, post cards, even printed images on cardstock or thick construction paper.
For Mod Podge - Children's white glue like Elmer's brand or make your own from flour and water. Because we mix it with paint, it will work for the grout. It will not work for the final finish coat.
The first step to any successful project is to gather up everything you need.
After protecting your work surface in some way, to make a tile exactly like this one, you will need a thin wooden base, paint, Mod Podge, gold glitter, two paper coasters, black durable ribbon, scissors, a glue gun, one ring and a black permanent marker.
If you don't have this stuff, don't worry about it. You can still do this.
The base could be made of cut out cardboard, a cut out box, really thick card stock, a number of things. Use your imagination and what you have.
For the paper coasters, if you don't have any you want to cut up, just print some cool art you like off the Internet on card stock. Don't have card stock? Glue the printed image to cardboard.
Puzzle pieces would work really well for this project as would actual bits of broken glass.
The next time one of the kids or pets breaks a pretty plate, save the pieces and make a mosaic tile. Broken bits of cups, teapots, figurines, many things would work for this activity. Just be sure to wear work gloves, if you use actual glass.
Paint covers everything.

Start by selecting the base and painting it.
In this case, I used a very inexpensive circular wooden plaque. It's thin, lightweight, and raw wood.
This could just as easily be done on scrap wood or any kind of thick cardboard. Pretty much anything that will support just a bit of weight and not bend will work.
Paint the base what ever color you desire. I went with plain Jane black craft paint and a nasty old brush I really should throw out. I can't seem to get it really clean anymore. Base coats are good places to use such inferior tools.
Any imperfections in brush strokes on the base coat will magically disappear in this project as long as they aren't holes of no paint at all.
To make the fake tile pieces, grab the scissors and a marker.

Using the proper tools makes a huge difference, not just in the project, but in your comfort level.
If you use coasters to do this, you really need a pair of hefty scissors.
As age is starting to kick my behind, I'm finding cutting thick objects to be more and more of a pain. I'm talking literally here. It hurts. My hands cramp and sometimes it's hard to continue.
Using a heavy duty pair of scissors helps this aggravation a lot. As a teacher, I got so used to using the same scissors I gave the students, i.e. child safety scissors, sometimes I just reach for them automatically.
It's really not worth all the extra effort required. Use the good ones. If you don't have a good pair, or just don't like dealing with curvy cuts and scissors, an Exacto knife would work well.
If using printed images, cards, pictures or anything roughly that thickness, kid's scissors will work great.
While waiting for the paint to dry, it's time to begin the next step.
I love paper coasters for crafting. These small, lightweight, really super cheap little works of art allow for some awesome imagery with just a bit of creativity.
What I'm calling a paper coaster here is really a form of cardboard with an image on each side.
This particular set of coasters came in a little box of eight for a dollar. Not bad.
Alternatively, the more pricey coasters often have a plastic ring, or perhaps a cork backing. They work much better as coasters, but don't waste your money on them for crafty fun.
If you don't have coasters, you could use playing or trading cards. Pictures printed on card stock or a few layers of construction paper would serve you well.
Just about any kind of image you can think of, as long as it's not totally flat, like a single sheet of paper will work for you. You need just a tiny bit of thickness for this to work.
However, be sure it's not something that can't be replaced because we are going to cut it up.
Also, for safety reasons, avoid picking images on tin, aluminum or any other kind of thin metal. It would work, but chances of you cutting yourself when making the mosaic pieces will be high.
If you just have to use something like that because the image calls your name, wear thick work gloves and use metal cutters.
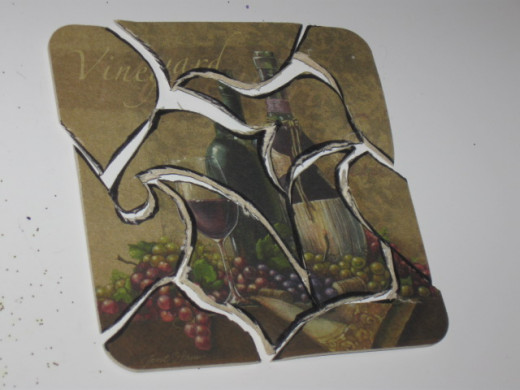
Step three turns the coaster into a jigsaw puzzle.
The image on the coaster needs to be broke apart. To do this, just grab a pencil or a marker and trace out where you want to cut. Then get to cutting it apart.
One could just go to cutting at random on multiple images and mix it up. The beauty of a mosaic is that by nature, it's all mixed anyway.
I wanted mine to roughly resemble the image as was which is why I did it this way but you don't have to.
Cut out pieces to make the mosaic look.
It's actually easier not to try to keep the image recognizable.
A major advantage of not trying to replicate the image is that spacial concerns are greatly lessened. Just put the pieces where you want them and have fun.
Use a pencil or marker to designate where each piece will go.

Step four is to apply our mosaic pieces to the base.
I did this with my trusty hot glue gun. I love this tool. I do not recommend it for everyone.
Rubber cement, white glue, or many other adhesives will work for this.
If doing this project with small children, the elderly or cognitively disabled, you might want to consider an alternative to the glue gun.
Lay all the pieces out before you start gluing them down. Things will look different. Further, you may encounter some spacial issues.
There needs to be space between each piece, just like there would be on a real mosaic tile where the grout would go.
Because of the space we have to allow between pieces, you will most likely have to make some adjustments in placement to get everything to fit.
Potential pitfall - Placement is it.
When doing this project with students over the years, almost always when something went wrong it was with this step because the student got excited. He or she skipped the marking where the pieces would go and just went glue happy. Usually, they ended up with a few left over pieces.
On the flip side of that, sometimes, everything lays out great but there is too much negative space left because the backing is so much larger than the original image. No worries on this one. Clip needed pieces from a duplicate image to fill in the gaps on the edges.
Safety tip -
If doing this project with students, minors, those in recovery, the elderly or infirm, people with respiratory problems, or those with cognitive disabilities, use markers that do not emit odors that can be huffed or cause physical damage if inhaled.
It may sound a bit over protective, but better safe than sorry. If you are doing this with a large group of any of the populations mentioned above, chances are very high you can't keep your eyes on everyone at one time.
God only gave you two eyes. Use safer markers, such as Crayola brand, if the above mentioned is the case.
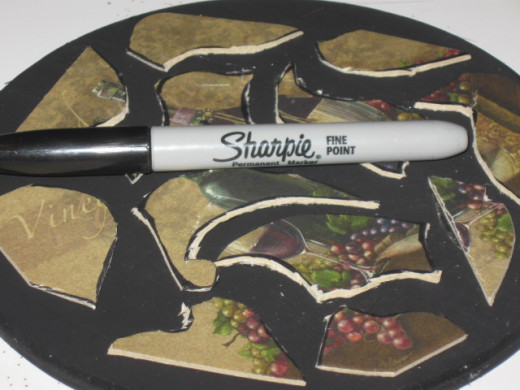
Step five gives an indication of what the finished piece will look like.
Once all the pieces are glued down as you want them, it looks pretty ugly. All the edging on the pieces cut shows funky cardboard colors and bits sticking up. Yuck.
Not to worry. Grab a Sharpie. Any permanent marker will work for this. I used black because I wanted my faux grout to be black and I like things to match.
Whatever color you are going to make your fake grout, use that color marker. I would like to say you don't have to but chances are high your project will suffer otherwise.
The reason for this is that we are about to be using a huge quantity of glue mixed with paint that will get on the edges. If the marker is a different color and gets the paint/glue mix on it, it's going to look bad.
Go around all the edges and color in the showing cardboard. I also made a perimeter edge line around each cut piece. It's an optional step but helps hide mistakes later, if you get the color on the edge a bit too far.

This takes forever.
Seriously, you are looking at some long dry time here. If doing this with classes or groups, plan on letting it dry overnight after this step is completed.
Be sure to inform your group in advance that this project will take overnight to dry. People can get very disappointed if they expect to have a finished project by the end of class or group and that is not the case.
Here comes the messy step in making a faux mosaic tile.
Mix a lot of glue and paint of the color you used for the base coat. Be sure when you do this that you mix enough the first time around, if you are doing a custom color.
The size of your base will largely determine how much you need to mix. I used about a third of a cup of glue and several liberal squirts of paint.
Mix the paint and glue really well until such time as you see no streaks of any pure color. Then, mix some more being sure to hit the bottom of the container where I promise you some is lurking.
Fill in between the pieces with the mixture. Painting is not exactly what's required here, more like dabbing on big drops. If you just paint, it will take forever for you to build up the height of the product required.
Don't worry over getting any on the edges. Just wipe it off with your finger. We are going around each edge at the end with a marker again to fix any little boo boos, so it's all good.
After filling in all the grout line areas and the edges, it looks like this.

The next day, when it's all good and dry, let's finish it off.
Grab the same marker color you used the first time and go around all the edges one more time to cover any little mistakes. Sprinkle on a little glitter and apply a final coat of Mod Podge.
Be sure to use only glue that dries clear for this step or it will ruin the project. As soon as it's dry, you have one finished faux mosaic tile piece.
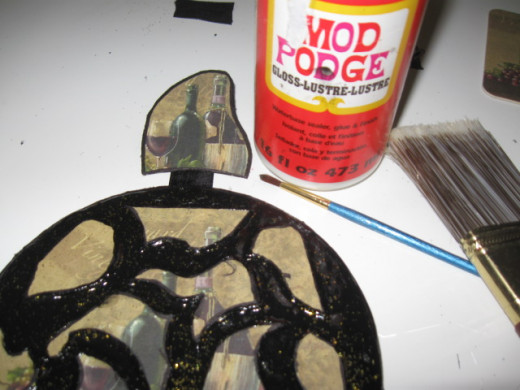
Want to be able to hang it?
It's so easy to create a hanger. Let's do one.
Coaster cut out for the hanger.

To make the tile's hanger, grab another coaster.
If you used something thinner for your original image, you need to add some cardboard or wood to the back of the one you will be using for this step.
Use the same color maker as used before to mark out the part of the coaster you want to be your hanger.
You could just use one whole. It would be much easier and faster but it's up to you.
Cut out the coaster. Color all the edges with the marker so no ugly cardboard shows.
The hanger and the mistake. I'm so glad it's on the back.

The hanger and tile connected.
How to connect the hanger to the faux mosaic tile.
Simple is the word here.
To make the hanger have the same round line at the bottom as the circular tile like I did, just lay the tile over it and trace the curve as your guideline for the bottom cut.
Flip the cut coaster hanger over. Cut a piece of strong ribbon the length of the hanger plus the tile plus two inches.
At the top, cut the ribbon in thirds to make an interior strip for the ring. As you can see in the picture, I forgot to do this. I had to peel up the ribbon and redo to fix it. I know better and still missed it.
Thread the middle strip of ribbon through the ring and glue it down to the back of the hanger.
Glue the ribbon to the back of the hanger and down the middle of the tile paying careful attention to how you line things up.
I used a lot of hot glue for this. A good alternative for kids or other groups that may have issues with a glue gun would be to just staple the ribbon to the back of the plaque.
Avoid using white glue for this step. It won't hold. There's just too much weight.
Give the entire assemblage one final coat of sealant and you are done!
Yahoo and happy day for you! I love it when a project is completed. There is great joy in making something.
Our ancestors did it all the time. Humans instinctively want to produce. Crafting is a great way to fulfill that innate desire, get something cool at a price you can afford and get back in touch with our inner creativity so stifled by modern life. Have some fun using your hands and come out with something totally unique, just like yourself.
One DIY fake mosaic tile on a shoestring budget that anyone can make.

What to use in a nutshell.
Materials
| Alternative
| Alternative
|
|---|---|---|
Wood base plaque
| Heavy cardboard
| Old mirror
|
Paint
| Ink
| Stain
|
Mod Podge
| Elmer's glue
| DIY white glue
|
Coasters
| Harry Potter trading cards
| Old calendar pictures
|
Ribbon
| Rope
| Chain
|
Forget the shopping. Get creative with what's already hanging around.
Would you like to see another cool mosaic look made without real tiles? Check out the most awesome thing made by Heidi Borchers and uploaded by iLoveToCreate.
© 2014 Rhonda Lytle


