DIY Flameless Fairy Flower Night Light - Cheap Chic Craft Demonstration

Battery operated DIY fairy flower light made from up-cycled materials

How to get a fairy light for close to free that uses no electricity.
How cool is that?
I'm really loving this project.
I love fairies to start with, so the theme was a sure fire winner but getting a cool light that burns not one kilowatt on the power bill.
That's sweet.
Do you ever find yourself in need of doing some scrap busting? Being the crafty type, I'm frequently in that boat.
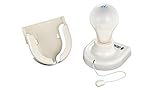
This time, it came right on the heels of a power outage. I had this portable light bulb that was battery powered.
It's way cool, useful and was really cheap. But, in all honesty, it's about as attractive as a root canal.
Worse, it wasn't easy to find in the back of the closet in the dark.
That can be easily fixed without it remaining the eyesore that got it shoved in the closet in the first place.
The ugly light bulb is about to get a make over, DIY fairy style.
The exact same steps used here could be applied to any theme you can dream up.
From frogs to monsters, it's just a matter of picking the right picture and coordinating ribbon and such to match it.
Check it out.
Let's turn an ugly light bulb and a coffee can into a fairy light.


Safety concerns and precautions for this project:
Use all power tools with caution and great care.
When using the drill, be sure to wear work gloves and safety glasses.
Further, be careful with the glue gun.
I can't count how many times I have burned myself and I know better.
Materials list:
- 1 coffee can
- 1 battery powered portable light bulb
- 1 fairy image
- 1 Shoestring
- Markers
- Clear Nail Polish
- Mod Podge (optional)
- Silver and purple thin ribbon
- Black net backed wide ribbon
- See through wide silver wired ribbon
- Artificial flowers
- Printer paper
Tools needed to make the DIY fairy flower light
1 drill with a bit
Scissors
Tape measure
Glue gun
Safety glasses
Printer/copier
This project is easy enough for older kids and teenagers to complete with supervision.
Because we will be using a drill and a glue gun, all children should be supervised to complete this project. For younger children, I would pre-drill the holes for them.
For teenagers, I would teach them to safely use the drill. Anyone not familiar with the safe operating of either a drill or glue gun needs to be supervised to do this.
It's not hard at all but power tools must be used responsibly to keep folks boo boo free.
This is what it looks like in the beginning. Kind of ugly, huh?

Where have all the coffee cans gone?
What does your family do with coffee cans when emptied?
As with any project, first things come first.
There are a few things to consider before diving in. First up, protect the table top you're working on. The last thing we need is for something to get messed up. A thick towel works great.
Next, pick your coffee can. Basically, there are three types. The one used here is a metal bottom can with thick paper that looks like metal on the inside. The cans also come solid metal and plastic.
If you go with a solid metal can for this activity, you will need to wear work gloves. If having minors make this, avoid solid metal cans. When we drill, the metal edges will be razor sharp making solid metal a poor choice for many younger ones.
Lastly, be sure you have power close by for the drill, glue gun and possibly a fan. I used a cordless rechargeable drill but any kind will work.


Safety first.
Do you always wear goggles and gloves when you should?
Do all the drilling first, so the light can shine through.
Of course, having said that, I have to be honest and tell you that I did not do it that way. I planned on it but when almost done, decided to put the four holes in the very top. It would be best to do all the drilling at one time.
Start by finding the midpoint on the can with it upside down. Leaving the label on for now makes that a snap. Once you find the middle, typically where the name is, make a mark with a Sharpie on each side of the can equal distance from the midpoint. The bottom of the can is going to be the top of our light.
Once you have your marks made, grab the safety goggles. Using a medium sized drill bit, carefully drill the holes. Laying the can on its side is the easiest way to do this. Hold the can firmly in place with one hand while using the other for the drill. If you have a buddy present, hold the cans for each other.
After the side holes are done, drill around the top and bottom making holes at one inch intervals. I used the banding on the label to get a close to straight line. Then, do the holes around or just behind where the image will be to give it that glowing affect.
Lastly, drill the holes on the bottom of the can or what will be the top of our light.
Remember, this part of the can is real metal. It's sharp and it will slice you open, fast. Be careful. Have an adult do this step for younger children. Teenagers, if you don't have an adult do it, which is advisable for most, wear the work gloves.
I'm not a fan of power tools but I do love this drill.


Once the drilling is done, it's time to paint the can light.
If you used a metal can for this, be sure to file down any sharp edges.
Running the drill bit through the hole backwards and forwards a few times takes care of most of it, but not all, especially on solid metal cans.
Pick your color and paint the entire surface of the can.
If you don't want to paint, Duck tape would be an awesome way to cover this can or you could use fabric or paper.
Most likely, it's going to take at least two coats. This one has three.
Let it dry between each coat.
Having a fan blow on the painted can decreases dry time to about ten minutes per coat.
Color, cut and clear coat the fairy image


Print, copy, draw or stick on a fairy image.
Originally, the plan was to do the fairy with a sticker. After determining that my sticker was way too small, I remembered an old coloring book I got at a Renaissance Fair forever and a day ago.
Run a copy of an original image rather than taking a chance on messing it up. Plus, that way you still have the image to make more copies of later.
You could just as easily print an image off the net, cut one out of a greeting card or calendar, even draw it yourself.
In this case, the fairy was colored using mostly magic markers. A pink colored pencil was used to lightly color the skin parts. Once the fairy was appropriately colored, she was sealed with clear nail polish.
The freshly sealed image was affixed to the painted, inverted can with hot glue.

The top and bottom of the can are both trimmed out in ribbon.
To the bottom of the inverted can, using a glue gun, apply the black net backed ribbon. The seam line here was covered by a thin purple ribbon which was repeated on top covering the line on a thin silver shimmer ribbon.
It's easy to pretty up the outside of any light

After the ribbon, let's add the flowers to the fairy flower light.
I had some left over artificial flowers from projects gone bye. Since the colors were pretty close, they got drafted.
The flower ends were cut off the stems with wire cutters. Flowers were then glued straight onto the can with the glue gun.
This DIY light is easily made to suit any theme you want.

Thread, tie, pull, glue and go. You just made a hanger.

How to make the hanger for the battery powered fairy light.
This part is as easy as tying your shoe, literally. Take a shoelace and carefully thread it through each opening on the side top of the can. Pull it from the inside and knot off each end. Then, pull it back taut on the outside.
To cover up this not so attractive shoe lace, wide double wired silver ribbon was glued directly over it where it goes into the can.
To cover up the joining, a flower was placed over each connection.

Last up is to make it light up.
This is as easy as peel and stick, which is exactly what I did.
Turn the can over. Peel the film off the super sticky adhesive on the light and stick it down really good.
Alternatively, if you want to be able to yank this light out fast and take it with you in the event of an emergency, use Velcro to attach the light to the can. You're going to need a decent size piece if you go this way.
I would recommend a square the same size as the base of the light just to be sure it holds.
Be sure you put the batteries in it first.
Turn your new fairy flower light over and find a place to hang it.
You're done!
You could further embellish at this point with stones, gems, beads or studs.
You could even Mod Podge the entire thing but since my fairy is sealed up, I'm calling it done.
Have a coffee can just laying there waiting for a purpose before dying in some disgusting landfill?
Give it a new life and get something fun in the bargain while having some fun.
Happy craft projects, people.
All images contained within this article are my own original photographs save the safety first graphic which I created using Cooltext.
Here's another great fairy light that has no flame nor does it use electricity.
The video above is curated content created by thecoolios who was nice enough to share it on Youtube.
Fairies and fun go hand in hand.


